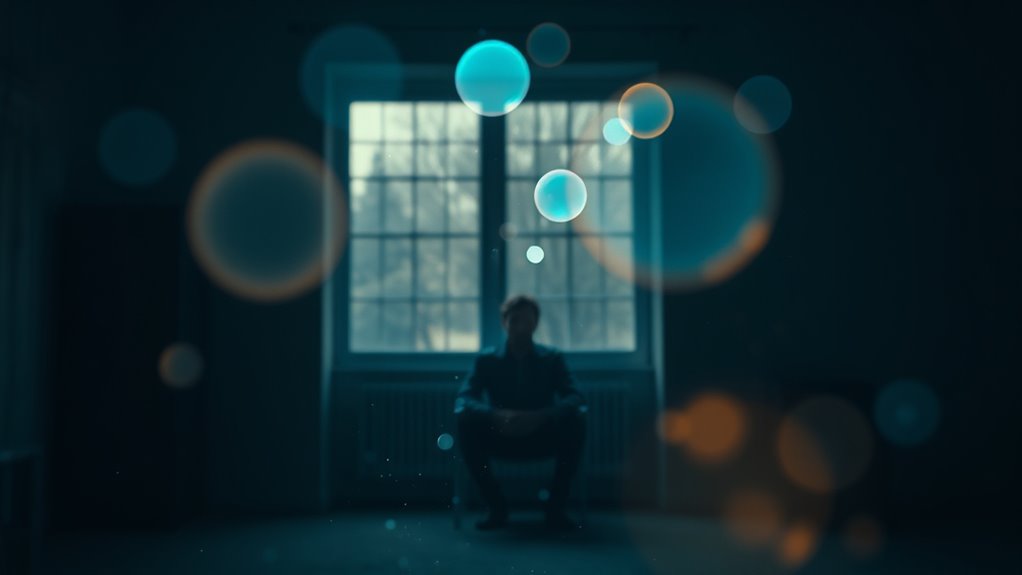
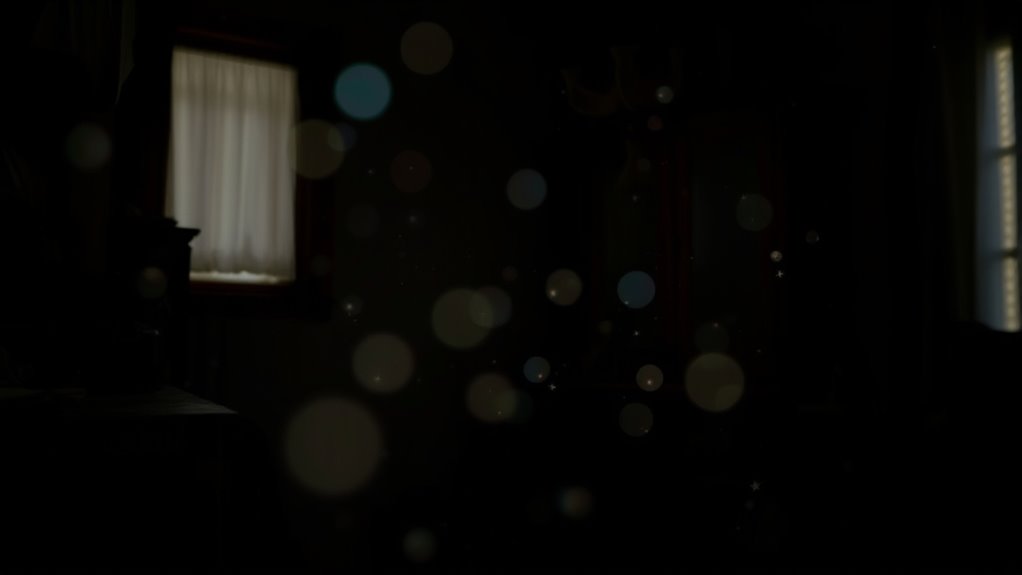
Many so-called paranormal orbs and strange light effects are actually caused by dust particles, water droplets, or pollen reflecting your camera flash, not supernatural activity. When these tiny particles are close to the lens, they catch the light and create bright, circular spots that can look mysterious. Camera settings, lens quality, and environmental factors also contribute to these illusions. Keep exploring to discover how understanding these effects can help you identify false sightings and improve your photos.
Key Takeaways
- Orbs in photos often result from dust, moisture, or pollen reflecting light, not supernatural activity.
- Camera flash and lens reflections create bright spots or streaks mistaken for paranormal phenomena.
- Proper camera settings and lens cleaning reduce artifacts caused by dust or water droplets.
- Environmental factors like dust, water droplets, and particles near the lens influence light reflections.
- Understanding optical interactions helps differentiate between natural camera effects and alleged paranormal sightings.
Altura Photo Camera Cleaning Kit – Lens Cleaner Spray, Brush, Pen, Blower, Microfiber Cleaning Cloths, Tissue Wipes for Canon Nikon Sony Fuji Olympus Pentax Sigma Tamron DSLR & Mirrorless Cameras
COMPLETE CAMERA CLEANING KIT: Our camera lens cleaning kit includes an alcohol & ammonia-free lens cleaner spray, cleaning…
As an affiliate, we earn on qualifying purchases.
As an affiliate, we earn on qualifying purchases.
The Origins of Orb Images and Their Common Causes

Many orb images you see in photographs are actually caused by common camera phenomena rather than supernatural activity. When you take a picture with a flash or in low light, tiny particles like dust, pollen, or moisture can reflect the light directly into your camera lens. These particles are often close to the lens, so they appear as bright, circular spots—what we call orbs. Camera lenses and the flash create a small, focused burst of light that illuminates these particles, making them stand out sharply in the photo. This effect is especially common indoors or in dusty environments. Recognizing that these orbs are simply reflections or reflections of particles helps you avoid jumping to supernatural explanations. Instead, it’s just basic camera physics at work. Additionally, the contrast ratio of your camera or projector can influence how prominently these particles appear in your images.

Amazon Basics UV Protection Camera Lens Filter, Scratch Resistant, Photography Filter, Lens Protection, 58mm
UV protection filter for general, everyday use
As an affiliate, we earn on qualifying purchases.
As an affiliate, we earn on qualifying purchases.
How Dust Particles Create Illusions in Photos

Dust particles floating in the air can create striking illusions in your photos, especially when lighting conditions are just right. When a camera’s flash or bright light hits tiny dust motes, they reflect light back to the lens, appearing as glowing orbs or unusual shapes. These particles are often too small to be seen with the naked eye but become prominent in photographs. The camera’s focus on a distant subject can cause nearby dust to appear larger and more defined. As a result, they seem to float or hover, giving the illusion of mysterious objects or spirits. Recognizing the phenomenon of light reflection helps you understand that what looks like an anomaly may simply be dust reflecting light, not an otherworldly presence.
(2 Pcs) Fotasy Soft Universal Cloth Flash Bounce Diffuser Cap for Flashgun Speedlite, Universial Flash Diffuser, Compatible with Canon Nikon Sony Metz Nissin Olympus Pentax Sigma Sunpak Flashes
Compact design and portable
As an affiliate, we earn on qualifying purchases.
As an affiliate, we earn on qualifying purchases.
The Role of Camera Settings and Flash in Creating Anomalies
Your camera settings and flash choices can markedly impact the appearance of anomalies in your photos. Adjusting exposure and aperture controls can emphasize or minimize reflections and dust particles, while flash reflection effects can create the illusion of orbs or other phenomena. Understanding these settings helps you distinguish between real anomalies and photographic artifacts. Additionally, awareness of AI-powered image analysis tools can assist in identifying false positives caused by camera settings.
Flash Reflection Effects
Camera flash settings and angles often play a crucial role in creating unexpected visual effects that can be mistaken for paranormal phenomena. When you position the flash too close or at certain angles, light can reflect off surfaces like glass, metal, or shiny objects, producing bright spots or streaks in your photos. These reflections may appear as orbs, disks, or other shapes that seem to float or hover, fueling ghostly interpretations. Additionally, using a direct flash without diffusers increases the likelihood of reflections and glare. The environment’s reflective surfaces, combined with your camera’s settings, can create complex light artifacts. Recognizing these reflection effects helps you understand that many anomalies are simply caused by light bouncing and reflecting, not supernatural activity. Being aware of ambient lighting conditions can further help in identifying genuine versus artifact images.
Exposure and Aperture Control
When you adjust exposure and aperture settings, you directly influence how light interacts with the camera sensor, which can lead to unexpected visual artifacts. A higher exposure allows more light in, making dust, fog, or orb-like shapes more visible in your photos. Conversely, lowering exposure can minimize these elements but might introduce noise or underexposure. Aperture controls depth of field and light intake; a wider aperture lets in more light, increasing the chance of capturing reflections or anomalies, especially in low-light conditions. Narrower apertures reduce light but can make dust particles or orb shapes stand out more sharply. Understanding these settings helps you manage how ambient light, dust, or reflections appear in your images, reducing misinterpretations of natural artifacts for paranormal phenomena.

MagicFiber Microfiber Cleaning Cloth, 6 Pack – Premium Cloth for Glasses, Lens, Screens & More
Glasses cleaner – Sourced from the highest quality microfiber that absorbs and removes dust, oil, smudges, fingerprints, dirt,…
As an affiliate, we earn on qualifying purchases.
As an affiliate, we earn on qualifying purchases.
Differentiating Between Paranormal Sightings and Camera Artifacts
Distinguishing between genuine paranormal sightings and camera artifacts can be challenging, especially since both often produce similar visual effects like orbs or streaks. To tell them apart, look closely at the details. Paranormal orbs tend to appear in specific locations, sometimes with a glow or aura that suggests movement or energy. Camera artifacts, like dust or lens flare, usually appear randomly, often with consistent shapes or patterns, and don’t change position relative to the environment. Consider the context of the photo or sighting—paranormal events often happen in specific settings or during emotional moments. Also, examine multiple images or videos; artifacts tend to be consistent across shots, while genuine paranormal phenomena may vary or appear only once. Additionally, understanding the dreaming process can help in analyzing visual phenomena, as both dreams and visual perceptions involve complex brain activity that can produce similar effects.
Techniques to Minimize Unwanted Artifacts in Photography

To reduce unwanted artifacts in your photos, start by ensuring proper lighting to minimize reflections and shadows. Adjust your camera settings, like ISO and shutter speed, to prevent overexposure and noise. Also, regularly clean your lens to avoid dust and smudges that can create distracting spots in your images. Incorporating appropriate camera features, such as using a lens with a high-quality filter, can further help in achieving clearer shots.
Use Proper Lighting
Proper lighting is essential for capturing clear, artifact-free images. When you use the right lighting, you reduce the chances of reflections, shadows, and glare that can create unwanted artifacts. To achieve this, consider:
- Avoid harsh, direct light that causes overexposure or hot spots.
- Use diffused lighting to soften shadows and reduce reflections.
- Position your light source at an angle to minimize glare on shiny surfaces.
- Incorporate natural light when possible for a balanced look.
- Control ambient light to prevent unwanted reflections or dust highlights.
- Many restaurants with live music often enhance their ambiance with effective lighting, demonstrating its importance for a vibrant atmosphere.
Good lighting helps your camera focus properly and ensures details are sharp without the interference of dust or dust-like artifacts. Properly managing your lighting setup creates a cleaner, more professional-looking photo.
Adjust Camera Settings
Adjusting your camera settings is essential for minimizing unwanted artifacts like dust or orb-like reflections. Start by choosing a smaller aperture (higher f-number) to increase depth of field, which helps keep particles out of focus. Use a lower ISO to reduce noise, which can accentuate dust spots. Adjust shutter speed to prevent motion blur and avoid overexposure, which can highlight artifacts. Additionally, understanding local laws can help photographers navigate regional differences in equipment regulations and standards.
| Setting | Effect | Tip |
|---|---|---|
| Aperture | Depth of field control | Use smaller f-number for background blur |
| ISO | Noise reduction | Keep ISO as low as possible |
| Shutter Speed | Motion blur prevention | Use faster speeds in bright light |
| White Balance | Color accuracy | Match lighting conditions for clarity |
Clean Lens Regularly
A clean lens is essential for capturing clear, artifact-free images. Dirt, smudges, or fingerprints on your lens can create unwanted spots, blurs, or orbs that distort your photos. Regularly cleaning your lens helps prevent these issues and ensures sharp, professional-looking results. Use a microfiber cloth to gently wipe the surface, avoiding harsh materials that could scratch. Keep lens cleaning solutions on hand for stubborn smudges, but never spray directly onto the lens—apply to the cloth first. Remember to clean your lens in a dust-free environment to avoid transferring particles. Additionally, using proper cleaning techniques can further reduce the chances of unwanted artifacts appearing in your photographs.
- Use a clean microfiber cloth for gentle wiping
- Avoid touching the lens with bare fingers
- Clean in a circular motion for thorough removal
- Store your camera with a lens cap on when not in use
- Regularly inspect and clean before every shoot
The Science Behind Light Phenomena and Visual Effects

Light phenomena and visual effects often appear mysterious, but they follow clear scientific principles. When you see orbs, streaks, or flares in photos, it’s usually due to how light interacts with your camera or environment. For example, dust particles or water droplets near the lens reflect or refract light, creating bright spots or shapes. Camera flash can cause backscatter, where light bounces off particles and back into the lens, producing orbs. Lens imperfections and reflections also contribute to these effects. Understanding these principles helps you recognize that many “mysterious” visuals are simply the result of light behavior and optical interactions. Controlling environmental factors and understanding your camera’s mechanics can reduce unwanted effects and help you better interpret your photographs.
Frequently Asked Questions
Can Orbs Appear in Photos Without Any Dust or Debris Present?
Yes, orbs can appear in photos even without dust or debris present. Sometimes, orbs are caused by moisture, camera lens imperfections, or reflections from nearby light sources. They can also be artifacts from digital processing or compression. If you notice orbs without dust, consider these factors. Adjust your camera settings, clean your lens, or change your lighting to reduce their appearance and get clearer photos.
Do Different Camera Brands Produce Varying Types of Visual Artifacts?
Absolutely, different camera brands do produce unique visual artifacts, as if each camera has its own personality. You might find Sony cameras adding a mysterious glow, while Canon’s tend to flirt with lens flare. It’s like choosing a pet—each brand leaves its own signature on your photos. So, when you see strange spots or streaks, blame the camera’s quirks, not ghosts, unless you’re into that sort of thing.
How Do Environmental Conditions Influence the Appearance of Orbs?
Environmental conditions markedly influence how orbs appear in photos. Humidity, dust, pollen, or water droplets in the air can create bright, circular artifacts when illuminated by your camera’s flash. Wind can stir up particles, making orbs more prominent or irregular. Low light increases the likelihood of capturing these artifacts, while clear, dry conditions lessen their appearance. You can reduce orbs by controlling your environment or adjusting your camera settings.
Are There Specific Times or Locations More Prone to Orb Phenomena?
Yes, you’re more likely to see orbs during foggy, humid, or dusty conditions, especially in areas with lots of particles in the air. Locations like old buildings, forests, or near water tend to produce more orbs because of the increased environmental particles. Nighttime is also prime time, since low light makes reflections and particles more noticeable in your camera or eyes. Keep an eye out in these settings for better chances.
Can Editing Software Reliably Remove Orbs Without Affecting Image Integrity?
Editing software can often remove orbs, but it’s tricky. Like clearing fog from a window, you risk losing genuine details or creating unnatural effects. Use tools carefully, focusing on subtle adjustments rather than heavy filtering. Always compare the before and after images to verify you haven’t erased meaningful elements. Trust your eye—if the orb feels out of place, gentle editing can help, but don’t overdo it.
Conclusion
Now that you understand how dust, camera settings, and flash create these optical illusions, you’ll see past the mystique. Instead of jumping to the paranormal, recognize the science behind the light phenomena—think of it as your own personal Da Vinci, illuminating the truth behind the images. With this knowledge, you’ll approach orb sightings with skepticism, appreciating technology’s role in shaping perception. After all, even in the age of smartphones, some mysteries are just artifacts waiting to be debunked.